Episerver blocks pattern for Umbraco
Episerver offers an elegant solution for reusable content in the form of "blocks". Umbraco doesn't offer the same experience out of the box, but by using the tools given to us we can recreate a similar experience.
Blocks in Episerver
Episerver divides content into 2 types: Pages and Blocks. Blocks are reusable content parts. These can be used inside pages or even other blocks. Note that Umbraco has only one "document type" that is used for both pages and reusable content.
In Episerver, blocks are defined in code as models. In Umbraco, document types are defined in the backoffice. Models can be generated optionally by using the ModelBuilder.
Block content can be created as either "for this page" or globally. The instance of a block can be reused only when created globally.
A block is added to a page/block as either a property directly on the Model, or as a ContentArea property. A ContentArea is a collection of content, most often blocks.
Reusable content in Umbraco (the old way)
If you've created an Umbraco website before you might have some experience with reusable content already. Instead of having pages and blocks Umbraco has generic "document types". You can use these to create pages, but they can do much more. The idea of using document types for reusable content isn't new, the MultiNodeTreePicker datatype has been with Umbraco for years. And with version 7.7 Nested Content became part of the Umbraco core. Both allow us to select and/or create content as part of a page.
Blocks pattern for Umbraco
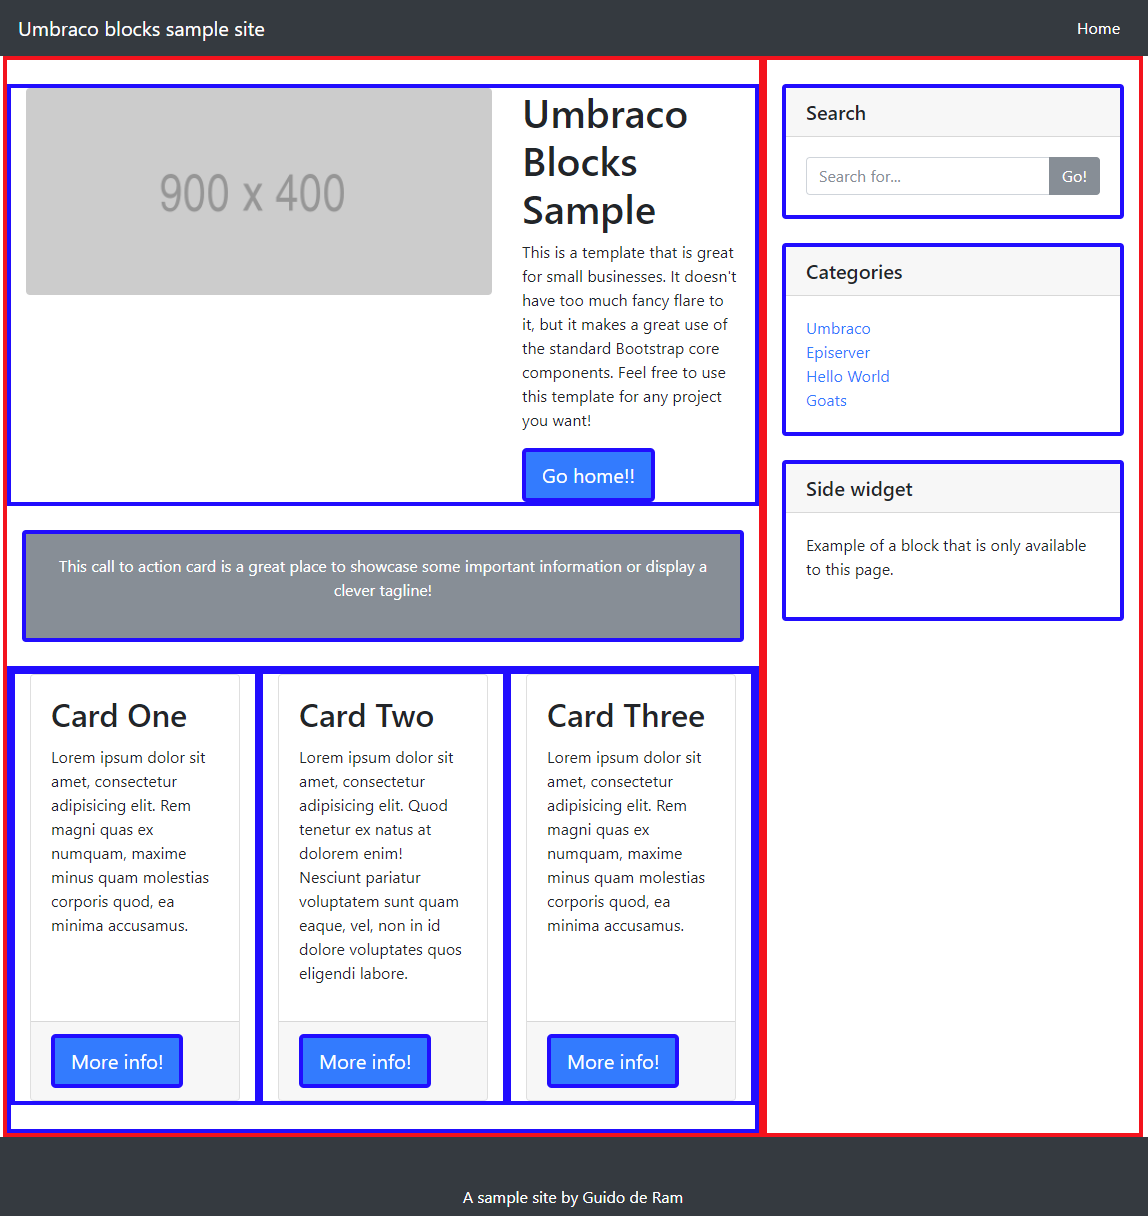
It's time to meet our sample site! The image below shows how the page is divided into blocks and content areas. Red borders indicate a content area, while blue borders indicate blocks. A link to the complete solution is included at the end of the article.

We start off by creating a normal page template which we will call "HomePage". If we look at the image above we can see that our page should have 2 content areas: a main content area and sidebar content area.
To simulate the content areas we can use Multi-node Treepicker or the new Nested Content data type. Both will give us an IEnumerable of IPublishedContent so it's very easy to switch between them without altering much of our code.
However, There's an important difference between the two. The Treepicker only allows you to select content from the tree, which emulates Episerver's global or reusable blocks. When using the Treepicker it's not possible to create blocks inline or "for this page". Nested Content on the other hand is pretty much the opposite. It allows you to create single use content inline, but it wont let you use reusable blocks. The solution here is to use Nested Content, but create an extra block content type we call "Reusable block". This is block with just one reference to another block. That way we can get the best of both worlds!
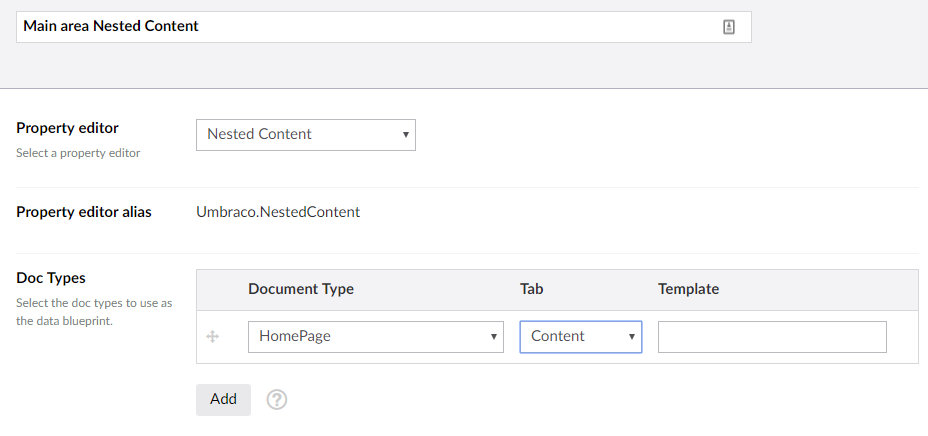
Now let's move on to creating our first content area by using the Nested Content data type. Here we can specify which block document types will be available to a content area. Note that Umbraco won't let us create an empty Nested Content data type. We can get around this by selecting an already existing content type like HomePage.

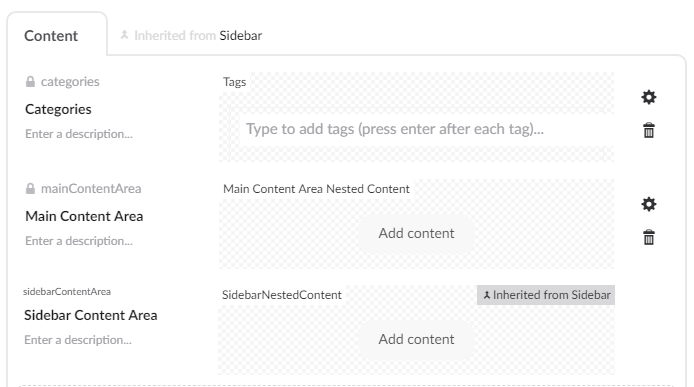
We will later update our data type with the correct document types. Now we can add our content area to the Page.

Creating a block
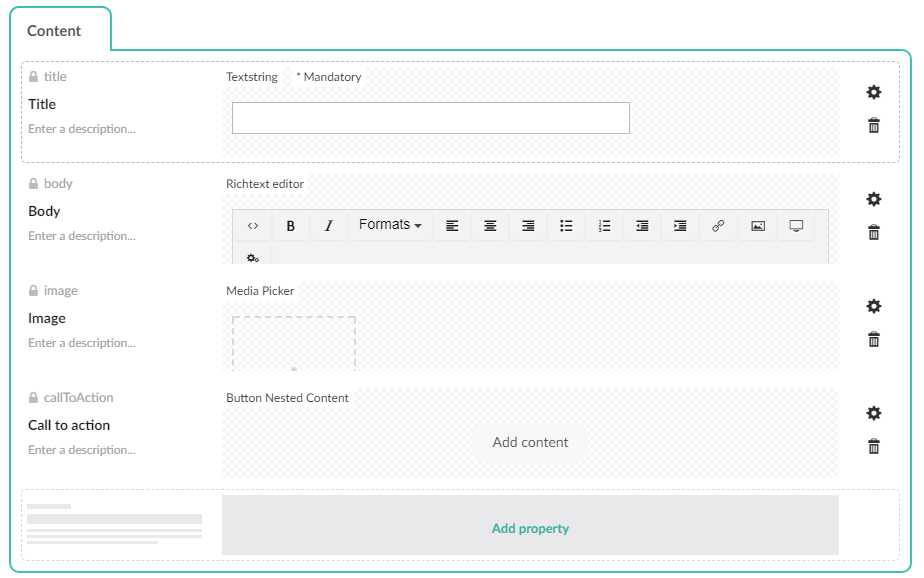
Let's start with the the top left block and call it "HeaderVisualBlock". It has an image, a title, text, and a button. For now we'll ignore the button as this requires us to create its own document and data type.

Now that we have an actual block we can update our previously created content area data type. Simply replace HomePage with our new block. The image below shows the complete data type from the sample site.

It's time to render the content area. At this point we could of course just manually loop over the collection of IPublishedContent in our page view and render the content, but that wouldn't be the Episerver way. Instead I'm going to introduce you to two html helpers that are going to do the job for us.
    public static class HtmlHelperExtensions
        {
            public static bool ViewExists(this HtmlHelper html, string viewName)
            {
                var controllerContext = html.ViewContext.Controller.ControllerContext;
                var view = ViewEngines.Engines.FindView(controllerContext, viewName, null);

                return view.View != null;
            }

            public static void RenderBlock(this HtmlHelper html, IPublishedContent block)
            {
                var blockName = block.DocumentTypeAlias.ToCleanString(Umbraco.Core.Strings.CleanStringType.Alias);
                var viewName = $"Blocks/{blockName}";

                var viewExists = html.ViewExists(viewName);

                if (viewExists)
                {
                    html.RenderPartial(viewName, block);
                    return;
                }

                html.RenderAction("Block", blockName, new { model = block });
            }

            public static void RenderBlocks(this HtmlHelper html, IEnumerable<IPublishedContent> blocks)
            {
                var blocksList = blocks as IList<IPublishedContent> ?? blocks.ToList();

                if (!blocksList.Any())
                {
                    return;
                }

                foreach (var block in blocksList)
                {
                    html.RenderBlock(block);
                }
            }
        }
In our page view we are going to call RenderBlocks for each content area (Nested Content type). RenderBlocks will loop through all the blocks in the area and call RenderBlock.
RenderBlock will look for a matching view by using a naming convention of "/Blocks/_{blockname}". If the view exists it gets rendered immediately. If it does not exist we're going to look for a controller.
Below you can see the view for the HomePage rendering 2 content areas.
<div class="container">
        <div class="row">
            <!-- Main Column -->
            <div class="col-md-8 content-area">
                @{
                    Html.RenderBlocks(Model.Content.MainContentArea);
                }
            </div>

            <!-- Sidebar Widgets Column -->
            <div class="col-md-4 content-area">
                @Html.CachedPartial("Sidebar", new Sidebar(Model.Content), 86400000, cacheByPage: true)
            </div>
        </div>
    </div>
The view for the block is pretty straight forward. Note that our Model is of type IPublishedContent. This project uses the Umbraco Model Builder, so we manually have to create a strongly typed instance of the model.
@using UmbracoBlocksDemo.Helpers
    @inherits Umbraco.Web.Mvc.UmbracoViewPage

    @{
        var headerVisualBlock = new HeaderVisualBlock(Model);
    }
    <div class="row my-4 block">
        <div class="col-lg-8">
            <img class="img-fluid rounded" src="http://placehold.it/900x400" alt="">
        </div>
        <div class="col-lg-4">
            <h1>@headerVisualBlock.Title</h1>
            @headerVisualBlock.Body
            @{
                Html.RenderBlocks(headerVisualBlock.CallToAction);
            }
        </div>
    </div>
As mentioned, it is possible to use a controller with the RenderBlocks method. This is recommended for more complex views where you want to keep your business logic separate or use view models. In the sample site a controller is used for the CategoriesBlock. Here we get the categories property from the homepage and set it on a view model.
public class CategoriesBlockController : SurfaceController
    {
        [ChildActionOnly]
        public ActionResult Block(PublishedContentModel model)
        {
            var umbracoHelper = new UmbracoHelper(UmbracoContext.Current);
            var home = new HomePage(umbracoHelper.TypedContentAtRoot()
                .FirstOrDefault(x => x.ContentType.Alias == HomePage.GetModelContentType().Alias));

            var viewModel = new CategoriesBlockViewModel(new CategoriesBlock(model));
            viewModel.Categories = home.Categories;

            return PartialView("~/Views/Blocks/_CategoriesBlock.cshtml", viewModel);
        }
    }
The complete sample site that you can find on github contains code for the entire HomePage. This includes nested blocks to render the cards and a sidebar for our side widgets.

Comments